How to enjoy Audirvana Studio with a GUI on Arch Linux
This tutorial will guide you through setting up Waydroid on Arch Linux to run Audirvana Studio with a graphical user interface, courtesy of Audirvana Remote for Android! The test environment for this tutorial is Endeavour OS (updated) with a 1440p monitor and Firewalld disabled. I recommend you use an alternate Google account to test this, even though Waydroid may be reputable, it is best to not use a Google account that you depend upon. More about Waydroid here: https://waydro.id/
Disclaimer: As you embark on the journey of following the instructions in this wiki article, it’s important to keep in mind that some steps may prove to be challenging and the path to a working setup differs based on a constellation of potential variables. However, don’t let this discourage you! Instead, approach the process with a patient and curious mindset.
I have done my best to retrace my steps to a successful setup below. However, I’m human and miss things, so supplement my instructions with your favorite search engine, or even better your favorite large language model.
Assumptions
- It is assumed that you have already figured out how to install Audirvana 2.8.1.3+ and have successully started it.
- Basic Android experience
- Basic Arch Linux administration skills
- Basic firewalld, ufw, or iptables experience if you choose to run a local firewall (I did not for this test).
- Basic proficiency with the Linux command line.
- Experience with the Audirvana Remote application.
Prerequisites
- A Linux Kernel with the
bindmodule - Setting up an AUR enabled package manager (
yayis one of many options) if you do not prefer manual installation of packages from the AUR.
Installing linux-zen and linux-zen-headers on Arch Linux
Waydroid, an Android container solution for Linux, requires the bind module to function properly. The bind module allows Waydroid to create bind mounts, which are essential for sharing directories between the host system and the Android container, enabling seamless integration and data access. Not to mention, Waydroid will fail to start without this module!
We need to add the bind module in Arch Linux, a simple and quick way is to install the linux-zen and linux-zen-headers packages. Here’s how to do it:
- Open a terminal and run the following command to install the packages:
sudo pacman -S linux-zen linux-zen-headers
- Once the installation is complete, reboot your system to start using the new kernel:
sudo reboot
That’s it! After rebooting, your Arch Linux system, choose Linux-Zen (or similar) from your bootloader. Then you will be running the linux-zen kernel, which includes the bind module. This process is straightforward and saves you time compared to manually compiling the kernel with the module (which would be more fun actually).
Setting up the yay package manager
To install packages from the Arch User Repository (AUR), we’ll use the yay package manager. Here’s how to set it up:
bash
sudo pacman -S --needed git base-devel
git clone https://aur.archlinux.org/yay.git
cd yay
makepkg -si
pacman -U <resulting-yay-package>
Installing and Configuring WayDroid
Installing Waydroid
With yay installed, run the following command to install Waydroid:
yay -S waydroid --noconfirm
Initializing Waydroid with GAPPS
To initialize the GAPPS version of Waydroid’s Lineage OS, run:
sudo waydroid init -f GAPPS
Then start Waydroid:
waydroid show-full-ui
Fixing internet connectivity issues
If you experience loss of internet inside of the Waydroid container (e.g., you opened the browser and can’t navigate to google.com), apply the fix from Issues · waydroid/waydroid · GitHub
sudo sed -i~ -E 's/=.\$\(command -v (nft|ip6?tables-legacy).*/=/g' \
     /usr/lib/waydroid/data/scripts/waydroid-net.sh
sudo systemctl restart waydroid-container.service
waydroid show-full-ui
Registering your device with Google
Google is going to give you a hard time about having an uncertified device, but you can certify it with your existing Google account (or, better yet, a burner Google account.)
- Open Waydroid from your app menu. Once Waydroid is running, you will get an error from Google stating your device isn’t certified.
- Make sure Waydroid is running with GAPPS installed. Run
sudo waydroid shellto enter the Waydroid shell. - Inside the Waydroid shell, run this command to get the Android ID:
ANDROID_RUNTIME_ROOT=/apex/com.android.runtime ANDROID_DATA=/data ANDROID_TZDATA_ROOT=/apex/com.android.tzdata ANDROID_I18N_ROOT=/apex/com.android.i18n sqlite3 /data/data/com.google.android.gsf/databases/gservices.db "select * from main where name = \"android_id\";"
- Copy the string of numbers printed by the command. This is your device’s Android ID.
- Go to https://www.google.com/android/uncertified in a web browser and paste in your Android ID to register the device on your Google account.
- Wait around 10 minutes for the Google services to reflect the change. You may need to restart Waydroid after this waiting period.
- The device should now show as Play Protect certified when you check in the Google Play Store app. You can now sign in and use Google apps normally.
Enabling Wi-Fi access for Audirvana Remote
After logging in with your Google account (preferably a burner account), you’ll need to make Audirvana Remote think it has Wi-Fi access. Run the following command while the Android environment is open (don’t use sudo):
waydroid prop set persist.waydroid.fake_wifi "com.audirvana.aremote"
sudo systemctl restart waydroid-container.service
Resizing Waydroid to fit your display
To resize Waydroid to better fit your display, run:
waydroid prop set persist.waydroid.width 576
waydroid prop set persist.waydroid.height 1024
sudo systemctl restart waydroid-container.service
Finally, open Waydroid again from the menu or via the command line with waydroid show-full-ui.
Result
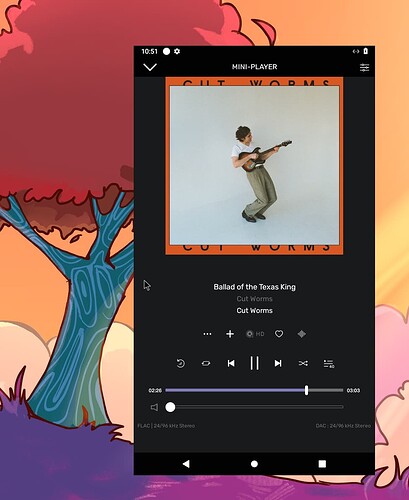
Since we on Linux do not have the luxury of a GUI yet, running the Android version of the Audirvana Remote gives us near feature parity with Windows & Mac users!
Note: I’m demoing this on KDE Plasma 6, so pressing the “Window” key (aka “Meta”) while clicking and dragging the window allows me to move the music player around my desktop.
